Workshops at Lab of Future

Lab of Future workshops are the canonical entry point into the Makers Guild.
Each workshop gives you hands-on experience building real hardware -such as a pen plotter, an air quality monitor, a home automation system, or essential electronics lab equipment.
When you complete a workshop, you take home a fully working device and receive one month of free access to the Makers Guild, where mentors, moderators, and fellow members support your continued learning and building.
You will have hardware that is defined and well known by our mentor, moderators and the other users. This uniformity is the best starting point to share a common growth path. Your Pen Plotter, your air quality sensor, your Home Assistant gateway or your Electronics Lab equipment are the ones we supplied you during each workshop and therefore no “unknown configuration”, “mysterious instrument” or other specific situations that would require a lengthy description and some documentation from your side to be able to help you.
Why Shared Hardware Matters
When everyone in the Guild has built the same pen plotter or uses the same ESP32 board, the community becomes incredibly powerful. Code that works for one member works for everyone. Troubleshooting is faster because others have solved the exact same problem. Tips and modifications are directly applicable to your setup—no guessing whether a solution will work with your specific configuration.
Can you join without attending a workshop? Yes. We provide complete documentation for all hardware used in our workshops. You can source components and build on your own. However, the workshop experience offers advantages that documentation alone cannot:
- Meet your mentor face-to-face - Ask questions, get unstuck in real-time
- Connect with fellow makers - Build relationships with people on the same learning path
- One month free Guild access - Full access to your workshop’s channel and community support
- Guaranteed working hardware - Even if assembly challenges you, you leave with a functioning device
- Quality time building together - For family workshops: four hands, shared problem-solving, real collaboration
Our workshops offer
Workshop Format
All workshops follow the same structure:
- Hands-on building: You assemble the hardware with guidance, not lectures
- Verification at each stage: We check your work incrementally - catch errors early
- Code introduction: Load and test your first program before leaving
- Guild access begins immediately: Start posting questions, sharing results, connecting with others
Location: Ground Floor, Office Land Building Block 2, Sheikh Rashid Street, Opp. Dubai Frame
Group size: Maximum 14 participants (10 teams of 2 for family workshops, 14 individuals for solo workshops)
Language: Sessions conducted in English
1. Pen Plotter Workshop
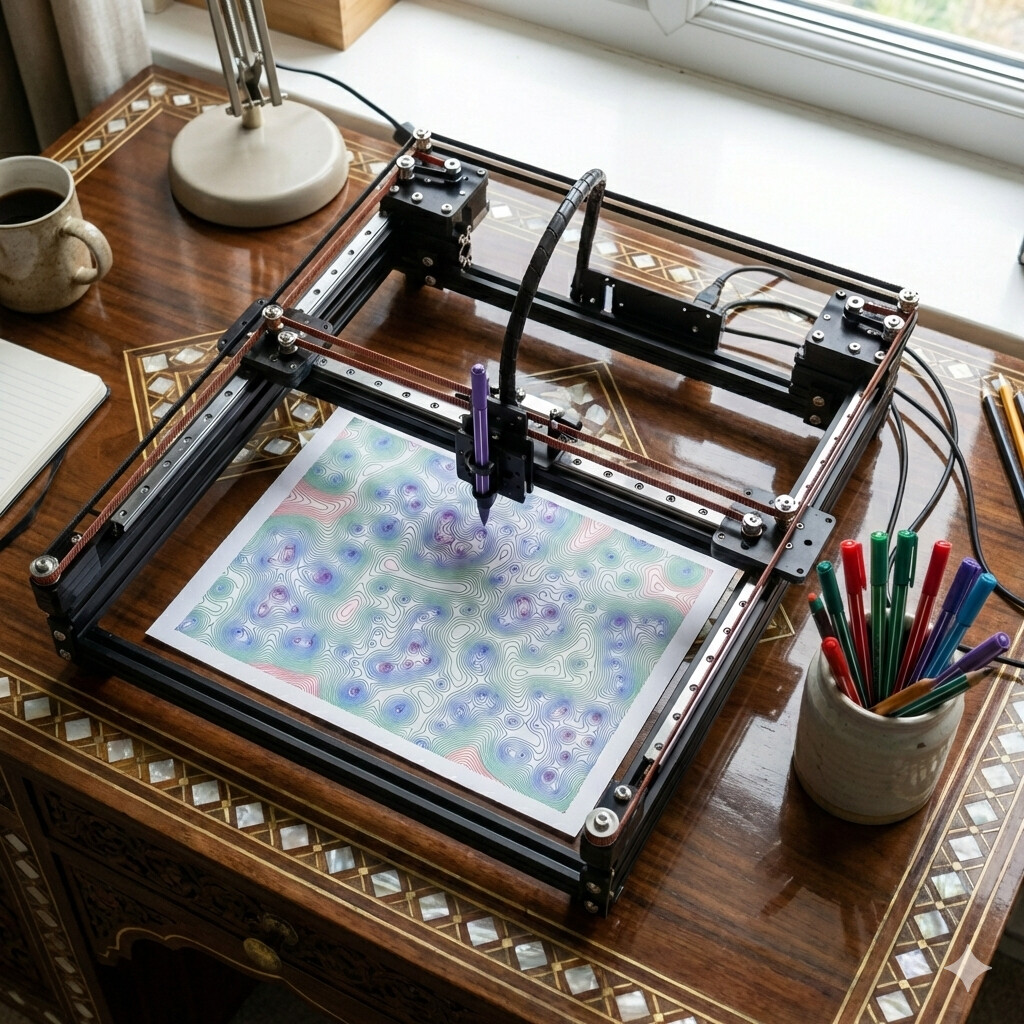
Who this is for: Creative families and individuals exploring robotics, generative art, and algorithmic design.
What you build: An A3-format pen plotter capable of drawing intricate patterns, plots from code, and artwork generated by algorithms.
The challenge: This workshop tests three skills:
- Visual organisation: Identifying and sorting the 100+ kit components
- Manual dexterity: Precise assembly with nuts, bolts, and alignment-critical parts
- Teamwork: “Is this the right screw?” moments where collaboration makes all the difference
Why four hands beat two: The plotter has several delicate assembly stages—squaring the frame, tensioning belts, calibrating motion. Having a workshop partner (parent-child, friends, partners) makes these steps manageable and turns potential frustration into shared accomplishment.
What you take home: A working A3 pen plotter, starter code for generative patterns, and access to the PenPlotters Guild channel with algorithms, techniques, and pen recommendations from the community.
Time commitment: 12 hours over 2 sessions (Saturday and Sunday 10 AM - 5 PM with 1 hour lunch break)
2. Home Automation Workshop
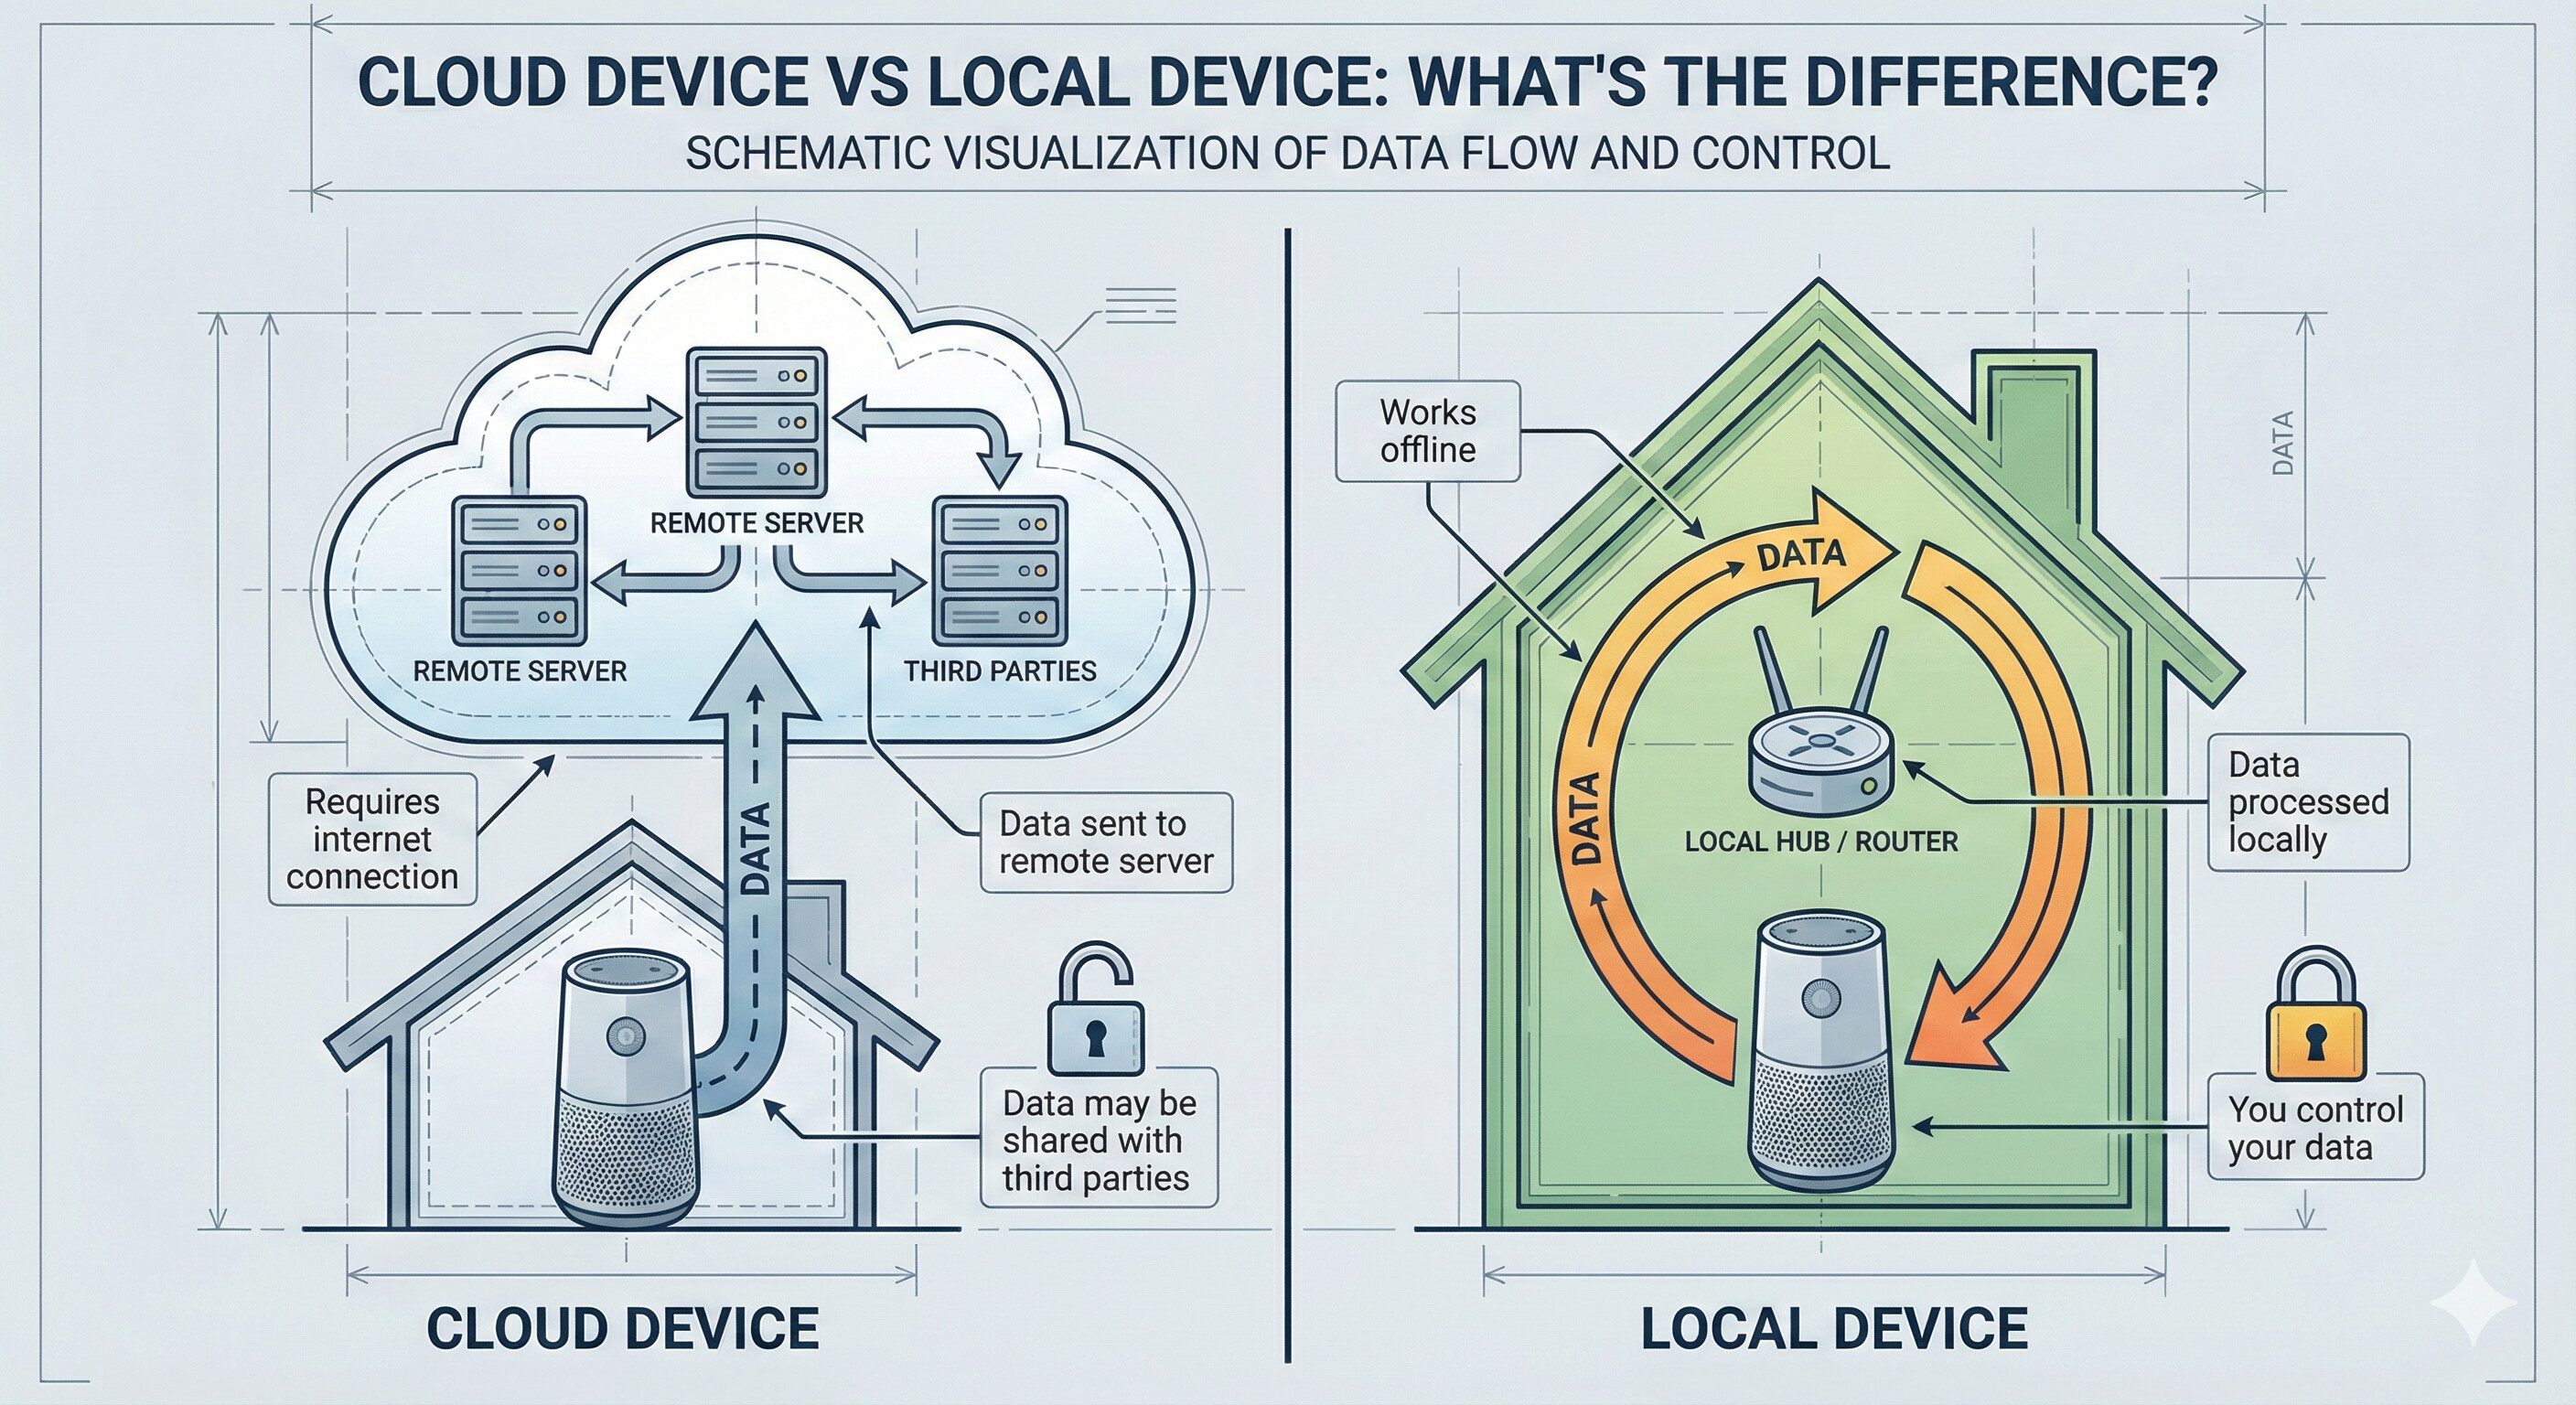
Who this is for: Anyone frustrated with cloud-dependent smart home devices that stop working when companies shut down servers, or concerned about privacy when cameras and sensors send data to unknown locations. Ideal for individuals and families who want complete control over their home automation without subscription services or internet dependency.
What you build: A complete Home Assistant server running on Raspberry Pi 4 (4GB), configured with local control and secure MQTT messaging. The workshop includes one Tasmota-flashed smart socket and one ESP32-based environmental sensor (BME680: temperature, humidity, pressure, air quality).
The challenge: This workshop develops system design and integration skills:
- System thinking: Plan which devices to automate and how they interact (lights trigger on motion, climate control responds to air quality)
- Dashboard design: Create a Home Assistant interface that’s functional, intuitive, and family-friendly
- Device integration: Connect Tasmota socket and ESPHome sensor using MQTT protocol
- Security configuration: Set up MQTT authentication, user permissions, and network isolation to prevent unauthorized access
Unlike commercial systems that hide complexity, you’ll understand exactly how each component communicates and how to troubleshoot when things break.
Why local-first matters: Commercial smart home systems (Google Home, Alexa, SmartThings) require internet connectivity and send your data to company servers. When companies change API terms, deprecate devices, or shut down services, your hardware becomes useless. Home Assistant runs locally - automations work even when internet is down, and you control your data completely.
What you take home:
- Raspberry Pi 4 (4GB) running Home Assistant OS on 64GB SD card, fully configured and ready to expand
- Tasmota smart socket for controlling lamps, fans, or appliances locally (no cloud required)
- ESP32 with BME680 sensor measuring temperature, humidity, barometric pressure, and air quality
- Pre-configured MQTT server with secure authentication
- Working automations demonstrating sensor-triggered actions
- Custom dashboard showing real-time environmental data
- Access to HomeAutomation Guild channel with automation recipes, integration guides, and troubleshooting support
Practical result: Control your bedroom lamp automatically when you enter the room, receive alerts when the air quality becomes poor, manage all devices from your phone without depending on internet connectivity.
Time commitment: 7 hours in one session (Saturday 10am-6pm with 1-hour lunch break)
3. Electronics Lab Workshop

Who this is for: Late teens and young adults curious about electronics and circuit design, or anyone who wants to repair rather than replace broken devices. Ideal for those who see a broken radio, lamp, or gadget and wonder “can I fix this?” instead of immediately reaching for the bin.
What you build: A DSO138 digital oscilloscope - a professional-grade instrument for visualising electrical signals, diagnosing circuits, and understanding how electronics actually work. You’ll solder every discrete component onto the PCB (SMD, the very small ones, are already in place), assemble the acrylic case, and calibrate the completed instrument.
The challenge: This workshop develops four fundamental electronics skills:
- Component recognition: Identify resistors, capacitors, ICs, and transistors by their markings and physical characteristics
- Soldering technique: Create reliable solder joints - shiny, smooth connections that conduct properly and won’t fail
- Schematic reading: Decode circuit diagrams to understand signal flow and component relationships
- Testing and calibration: Use your completed oscilloscope to verify it works correctly, then calibrate for accurate measurements
Why you need an oscilloscope: If a multimeter tells you “there’s 5V here,” an oscilloscope shows you what that voltage is actually doing—pulsing, oscillating, corrupted by noise. It’s the difference between knowing a heart is beating and seeing the ECG waveform. For anyone serious about electronics, an oscilloscope transforms guesswork into understanding.
What you take home:
- Completed DSO138 digital oscilloscope (0-200kHz bandwidth, ideal for audio, Arduino, and basic circuit work)
- Complete soldering kit: temperature-controlled iron, solder wire (50g), precision pliers
- Skills to tackle future electronics assembly projects
- Understanding of how to read signals, identify problems, and verify circuit operation
- Access to Electronics Lab Guild channel with component guides, soldering tutorials, and DIY kit recommendations
Your permanent toolkit: The soldering iron, solder, and pliers you receive are yours to keep and bring to future workshops. As the Electronics Lab community explores more DIY kits (function generators, power supplies, LED-based gadgets), you’ll already have the tools needed to participate.
What’s next: The Electronics Lab channel features masterclasses on specific Aliexpress/DIY kits with live video build sessions. The community votes monthly on which kit to tackle next - whether it’s a logic analyser, variable power supply, or signal generator. Build your bench equipment gradually, learning new techniques with each project.
Time commitment: 6 hours in one session (Sunday 10am - 5pm with 1-hour lunch break)
4. Air Quality Monitor Workshop
Who this is for: Anyone concerned about indoor air quality and its impact on health, sleep, and concentration, or interested in learning microcontroller programming with a practical, immediately useful application. Ideal for individuals who want to build IoT devices that work locally without cloud dependencies or internet requirements.
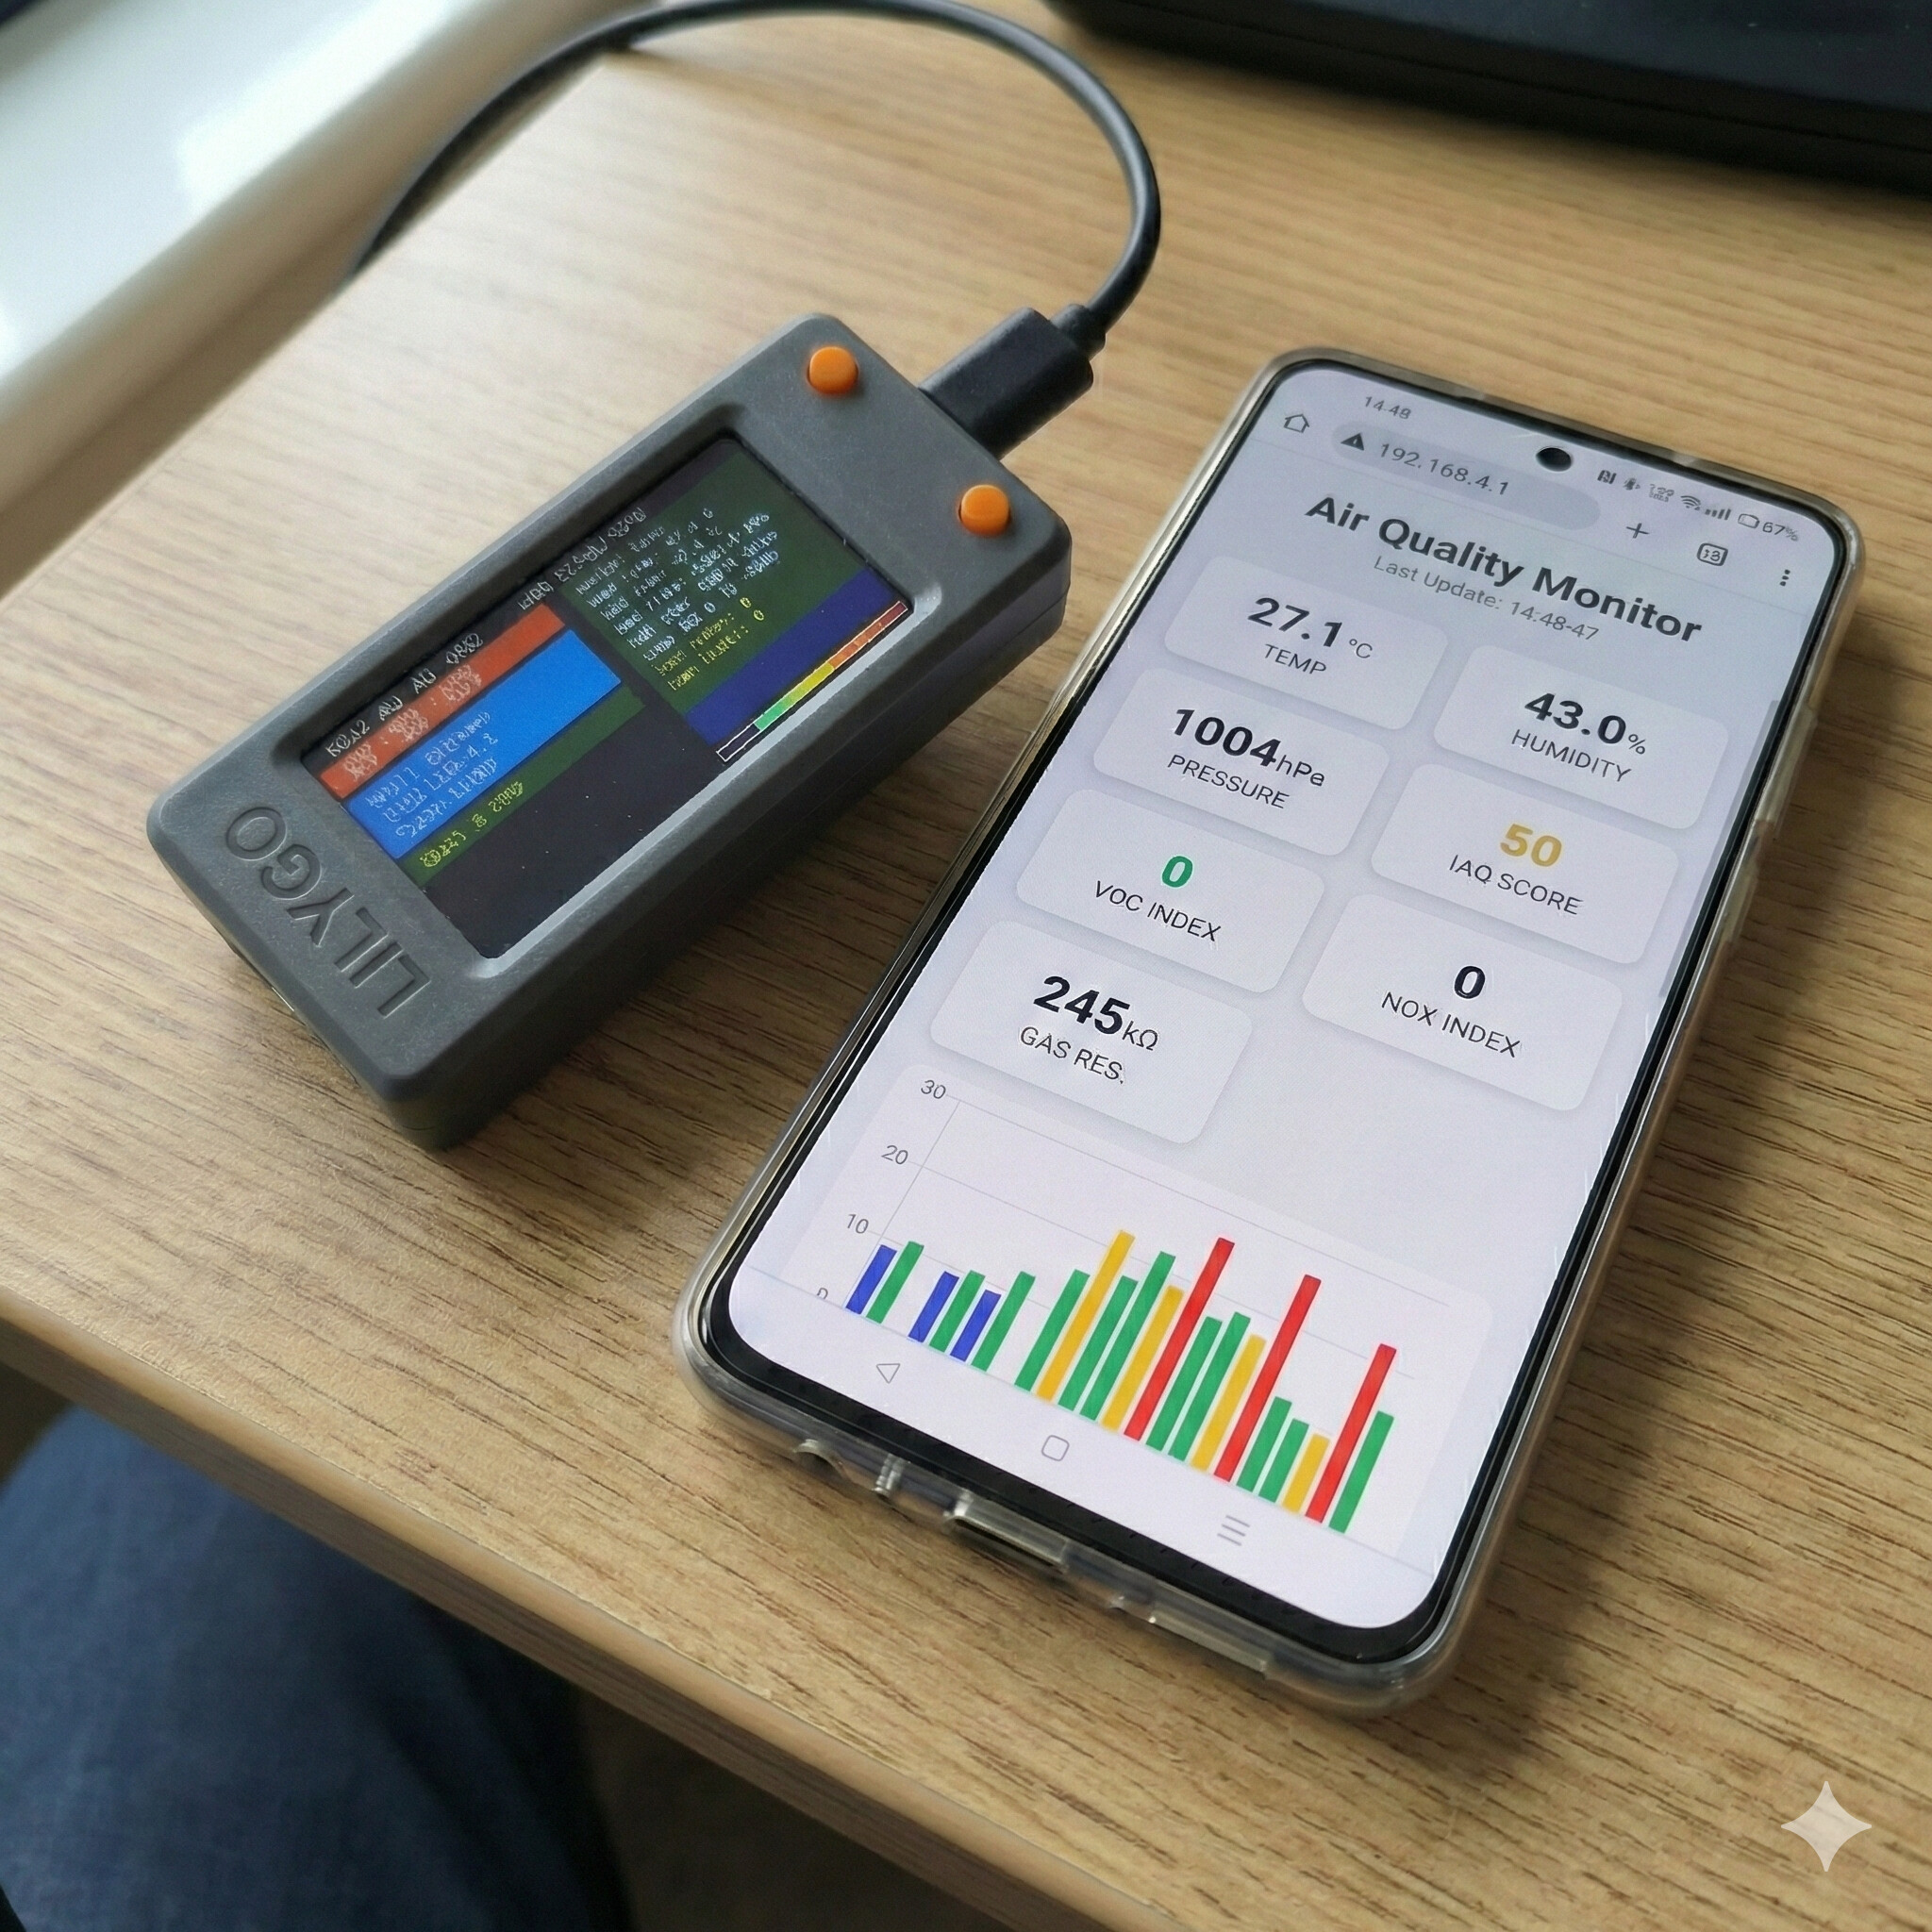
What you build: A complete environmental monitoring system using ESP32 T-Display and BME680 sensor, capable of measuring temperature, humidity, barometric pressure, and air quality (VOC/gas detection). The device operates standalone or connects to WiFi, publishes data via MQTT, and includes a web dashboard accessible from any browser on your network.
The challenge: This workshop develops microcontroller programming and system integration skills:
- Code comprehension: Understand a 500+ line functional program broken down function by function—captive portal, display management, WiFi modes, MQTT publishing, sleep management, sensor reading
- Sensor integration: Learn I²C protocol and how to connect multiple sensors to a single microcontroller
- Network architecture: Configure the device for Access Point mode (creates its own WiFi network) or Station mode (joins your existing network)
- Automation logic: Program a Tasmota socket to trigger a fan or air purifier when temperature or CO₂ exceeds thresholds
Why this matters beyond air quality: This isn’t just about monitoring temperature—it’s about understanding how professional IoT devices work. The code you’ll study handles WiFi connection failures gracefully, manages power consumption with sleep modes, serves a web interface, and communicates via industry-standard MQTT protocol. These patterns apply to weather stations, plant monitors, industrial sensors, or any device that measures and responds to environmental conditions.
What you build (technically):
- Captive Portal: When device starts, it creates its own WiFi network. Connect and configure without typing IP addresses
- Dual WiFi modes: Access Point (device is the network) or Station (device joins your network)
- MQTT integration: Publishes sensor readings every 30 seconds; other devices subscribe and react
- Web dashboard: Clean, responsive interface showing real-time readings, configurable via any browser
- Sleep management: Battery-powered operation with intelligent wake cycles
- Sensor fusion: BME680 readings processed through Bosch Sensortec library for accurate air quality index
What you take home:
- ESP32 T-Display (240×135 colour screen, WiFi/Bluetooth, USB-rechargeable) programmed and tested
- BME680 environmental sensor (temperature, humidity, pressure, VOC/gas detection)
- Tasmota smart socket configured to trigger based on sensor readings
- Complete, documented source code with function-by-function explanations
- Understanding of I²C sensor protocol and how to add additional sensors (CO₂, particulate matter, light)
- Access to AirQuality Guild channel with sensor guides, code libraries, automation recipes, and case studies
Practical applications:
- Monitor bedroom air quality and get alerts when CO₂ levels affect sleep quality
- Trigger ventilation fans when humidity exceeds safe levels
- Activate air purifiers when VOC readings indicate poor air quality
- Log environmental data over time to identify patterns
- Expand to multi-room monitoring with multiple sensors reporting to one dashboard
No internet required: Unlike commercial air quality monitors that require cloud services and subscriptions, your device operates entirely on your local network. Data stays in your home. The system works even when internet is down. You control everything.
The code-focused approach: While other workshops emphasise hardware assembly, this one prioritises understanding the software. The hardware assembly is straightforward (connect sensor to I²C pins, upload code). The learning happens in comprehending how the program manages multiple tasks simultaneously: reading sensors, updating display, serving web pages, handling MQTT messages, managing power. You’ll leave understanding not just what the code does, but why it’s structured this way.
Sensor expansion options: The workshop introduces I²C protocol because it’s how you’ll add more sensors. The same two wires (SDA, SCL) can connect:
- SGP30 for eCO₂ and TVOC measurement
- SCD40 for accurate CO₂ readings (400-5000ppm)
- PMS5003 for particulate matter (PM2.5/PM10)
- BH1750 for ambient light sensing
- DS3231 for accurate timekeeping
The code architecture supports adding sensors without rewriting the entire program. The AirQuality channel features masterclasses on specific sensor integrations with tested code examples.
What you take home:
- Fully functional air quality monitor with ESP32 T-Display and BME680 sensor
- Tasmota socket programmed to respond to sensor thresholds
- Complete source code with detailed comments and function explanations
- Practical understanding of Arduino IDE, I²C protocol, and WiFi/MQTT architecture
- Foundation for building multi-sensor environmental control systems
- Access to AirQuality Guild channel with sensor integration guides, code libraries, and community projects
Time commitment: 8 hours over one day (10am-2pm and 3pm-7pm, with 1-hour lunch break)
After Your Workshop
Your one-month free access includes:
- Full access to your workshop’s Guild channel (Masterclasses, Showcase, Documents, Support Q&A)
- Ability to post questions and get help from mentors and experienced members
- Access to code libraries, STL files, configuration guides specific to your hardware
- Invitation to monthly live sessions where the community votes on topics
Continuing your membership:
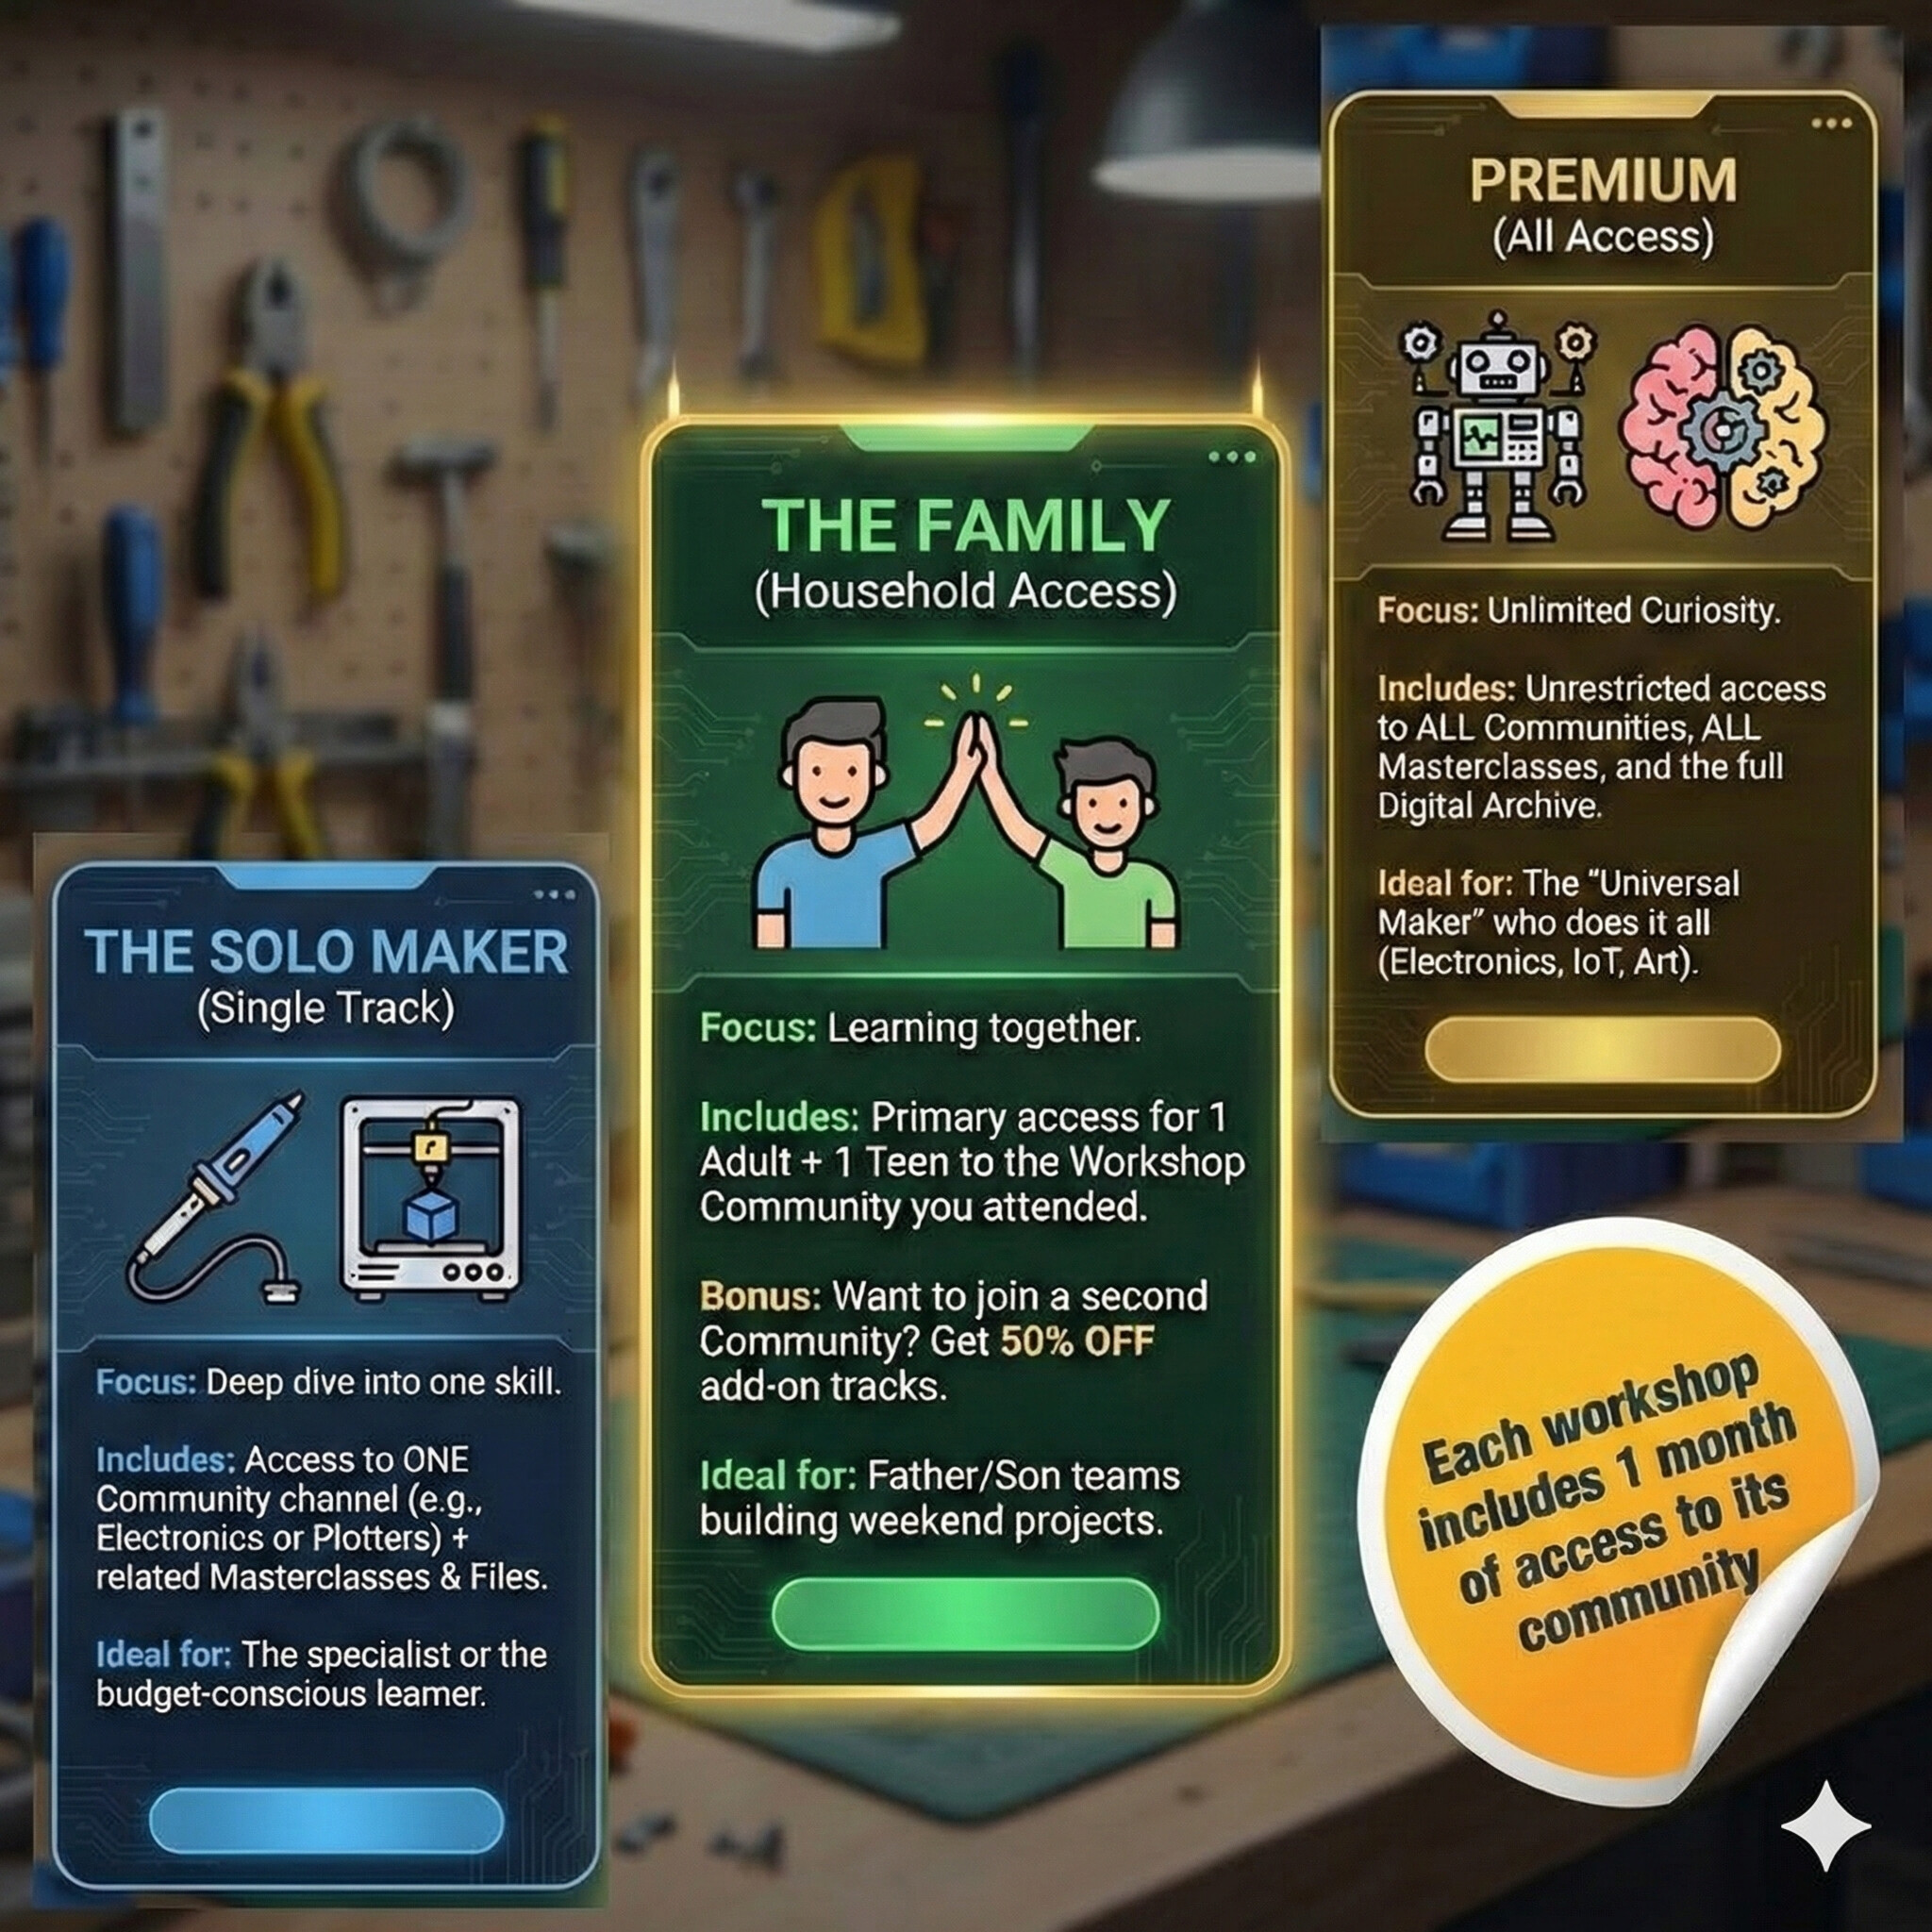
After your free month, choose a tier that fits your needs:
- Solo Maker: 149 AED/month - One workshop channel
- Family Tier: 279 AED/month - Two accounts, ideal for parent-child teams
- Premium: 599 AED/month - All channels, priority support, exclusive masterclasses
Or simply attend another workshop to explore a different domain and get another month free.